Highly Available and Scalable Microservice Deployment in AWS ECS
1.) High Availability
Everybody knows HA is an ability of a system or system component to be operational for a very long time without any failure. Commonly High Availability is achieved by avoiding any single point of failure in any component of the application and infrastructure. To avoid any single point of failure, redundancy should be ensured for each and every components. If we consider a typical web application as shown below, it has a web tier, an application tier, and a database tier.

Suppose if anything went wrong in the Web server will bring the entire application down, similarly Application server, DB server etc are the single point of failures. Even an interruption in the internet connectivity in the region may affect the application availability. Consider the following HA architecture. Multiple web, application and DB servers are configured in Geographical Region 1 and the traffic is handled using load balancers. So if any of the webservers went down the other will take over the load. Similarly app and DB servers will work in the same manner. If the entire region went down, the application will be served from the second region. This is a typical example of an HA architecture.

Infrastructure level, as well as application-level compatibilities, are essential for an HA implementation. Infrastructure level HA can be obtained as per the diagram is given above. HA cannot be implemented only by infrastructure redundancy. The application also needs to be compatible with HA and scalability. It is not a very complex task. Some of the basic ideas to make the application HA/Scalable are given below.
1.a.) Do not keep the user sessions locally.
For example, if you have two web servers under a load balancer, the user can access the application from any of the webservers. If he logged in to the first web server, the login sessions will be created in the first web server only. Later, if the traffic switched to the second web server, a valid login session will not be there in the second web server so the user will be logout automatically. To avoid these kinds of issues, the sessions should be kept in a common location. For example, the user sessions can be kept in a centralized Database. So, even if the user is connected to a different webserver, he can continue accessing the application without login again.
1.b.) Use centralize and HA Databases
Use centralized DB for your application as we are commonly using with traditional applications. Any webserver/application should be able to connect to the database from different regions. The DB server should also be configured as a Highly Available model. If the DB is not available from one region, it should be available from the other region. Data should be synced automatically so that whenever a failover occurred, there should not be any data mismatch issues arise.
1.c.) Keep the files in a centralized location
If any files are uploaded/created/accessed by the user (apart from code and files related to application), keep them in a centralized redundant location. For example, if a user is allowed to upload his profile picture and it is kept in the webserver to which he is currently connected, he may experience “File not Found” exceptions later when connected to a different web server. If the files are kept in a centralized location, the user/application will be able to access the files irrespective of the webserver he is currently connected to.
1.d.) Create redundancy for supporting services.
Confirm that all the supporting services using along with the application have redundancy. For example, if we are using SMTP for sending out notifications, use multiple SMTP servers and ensure the failure of any of them will not affect the entire system. Use third-party services is a good idea, most commonly third party service providers will ensure HA of their service and we can utilize them.
2.) Scalability
Scalability is the property of a system to handle a growing amount of work by adding resources to the system. Scalability is an important factor for uninterrupted service delivery. HA is offering redundancy but if the environment is not scalable, resource crunch may occur during unexpected load and the services may be interrupted. In a scalable environment, there will be systems in place to monitor the resource utilization, traffic etc, if it exceeds the predefined threshold, additional resources will be provisioned automatically and the load will be distributed to the newly provisioned environment. Once everything is cooled down, new resources can be terminated if needed.
3.) Overview of AWS Services
Letus see how to configure the AWS environment for deploying a Highly available and Scalable application based on microservices. To illustrate the HA and scalability configuration using an example, we will use the following services from AWS. Please see a quick description of the services we are going to use.
3.a.) Elastic Container Service: Amazon Elastic Container Service (Amazon ECS) is a highly scalable, high-performance container orchestration service that supports Docker containers and allows you to easily run and scale containerized applications on AWS.
3.b.) Elastic Container Registry: ECR is the container registry provided by AWS. It is similar to the docker hub. You can create a private docker repository and push/pull your custom docker images.
3.c.) Task Definition: Task definition is a part of ECS. It is a template where you can define, which docker image is to be used, which network method to be used, how much memory to be allocated for the container, how much CPU to be allocated, your environment variables, etc.. This is just like a template in which we define the configurations and specifications for a container when it runs inside a host in the cluster.
3.d.) Services: Task definition is just like a template. We have to specify, where that Tasks to be executed ( deploy the container- in which cluster? In which host etc..), how many Tasks to be executed, whether load balancer to be used, how to scale the containers etc.. in the “Services”
3.e.) ECS Clusters: ECS cluster is a logical grouping of Tasks and Services. We can group our microservices and put them in the desired cluster. For example, we can create a cluster named “WebCluster” and put all our front-end serving Nginx containers in it. New EC2 instances will be launched inside this cluster and new Nginx containers will be deployed in the “WebCluster” on scale. Similarly, if we have a microservice that is responsible to process images, we can create another cluster named “ImageProcessorCluster” and place all image processing containers in it. Amazon is providing clusters with EC2 ( we have to manage the VMs) and Fargate (AWS will manage the instances).
3.f.) Autoscaling Group: Autoscaling groups is the feature of AWS in which the auto-scaling related settings and policies can be configured. When an ECS cluster is created, Autoscaling groups will be created automatically. Each ECS cluster will have its own autoscaling groups. In the auto-scaling group, we can define, the minimum number of instances to be run the Cluster, the desired number of instances, the maximum number of instances (The autoscaling group is configured to increase the number of instances on increasing the load but we have to set an upper limit). The scale-in (When to remove an instance) and scale-out (when to add a new instance) policies can be configured in the autoscaling group. Scale-in Scale-out policies are mainly created based on Cloudwatch metrics. For example, a scale-out policy can be created which will check the average CPU utilization of the cluster and add a new instance if the CPU utilization reached 70% for the last 2 minutes. Similarly, scale-in policies can be created which will check the CPU utilization of the cluster and remove one instance if CPU utilization is below 20% for the last 30 minute
3.g.) Launch Configuration: Launch Configuration is the location where we can define ‘which AMI to be used’, ‘what is the size of Instance’ etc. This launch configuration will be used by the autoscaling group. When the autoscaling group gets a trigger to add a new instance, it will pick up the Instance configuration from launch configuration.
3.h.) Amazon Machine Images (AMI): AMI is the machine image used to launch instances. For example, if an ubuntu instance needs to be launched, any Ubuntu AMI should be used. Custom AMIs can also be created. for example, if we need an image that is pre-installed with some custom application etc, Launch a new instance, install and configure the required software, shut down the VM and then create an image from the VM. New custom AMI is ready to use. New instances can be launched from this custom AMI and the new VMS will be installed with predefined custom applications.
3.i.) EC2 Instances: This is the Virtual machines in AWS
3.j) ELB: ELB stand for elastic load balancers. It is used to distribute the traffic between the instances/containers etc.
3.k.) RDS : RDS is the Database service provided by AWS
3.l.) SNS : Simple Notification Service is used to send out emails, messages etc from AWS
3.m.) CloudWatch : Cloudwatch is the monitoring system that collects the metrics from various resources in AWS. For example, Cloud watch monitors can provide information on CPU utilization, network utilization, io performance, etc. Custom metrics can also be created. These metrics can be used for different actions like autoscaling
4.) Application HA Configuration
4.1.) Create a repository in ECR
- Login to aws account
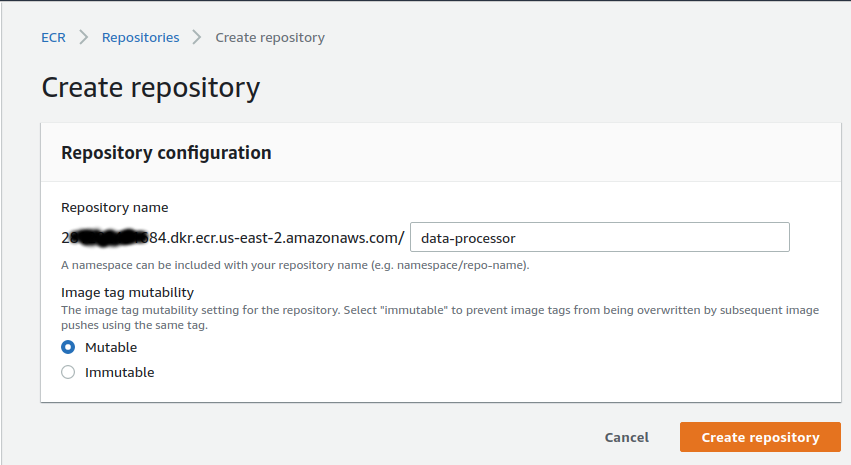
- ECR >> Repositories >> Create Repository
Give a meaningful name for your repository based on the microservice you are planning to keep this repository as a docker image. Note down the repository URL. We need it for further use.
4.2.) Create your docker image
Suppose we have created a java application that is compatible with the HA environment and the compiled file is “dataprocesssor.jar” and it will listen to port 8080 while running the application command line. Please see sample docker files that can be used to containerize the application.
Note : Please see this link for docker basics http://karunsubramanian.com/linux/what-is-docker-an-absolute-beginners-guide/
To containerize the application, we will need a “Dockerfile”. Docker file is a text file in which we define the base image of the docker container and all the commands we need to run while creating the image. See the sample docker file given below. This can be used to containerize the app “dataprocessor.jar”. Keep the “Dockerfile” in the same location where dataprocessor.jar resides.
Dockerfile
 FROM maocorte/alpine-oraclejdk8
 ADD /dataprocessor.jar //
 RUN apk update && apk upgrade
 RUN apk add --update curl bash tree wget
 CMD java -jar /dataprocessor.jar
To build the docker image run the following command from the terminal (Assumes, latest docker engine is installed in your machine)
# docker build -t data-processor .
On executing the above command, a docker image will be created with the name “data-processor”. Latest build will be automatically tagged as “latest”. So the current image name with tag will be “data-processor:latest”
4.3.) Push the docker image to ECR
Now, we need to push the latest image to ECR. Use the following commands.
Note: [Assumes the latest AWS CLI is installed in your machine and configured. (https://docs.aws.amazon.com/AmazonECR/latest/userguide/ECR_GetStarted.html) ]
4.3.a.) Login to AWS ECR
# $(aws ecr get-login --no-include-email --region us-east-2)
4.3.b.) Tag your image
# docker tag data-processor:latest 28xxxxxxxx684.dkr.ecr.us-east-2.amazonaws.com/data-processor:latest
4.3.c.) Push the image to AWS ECR
# docker push 28xxxxxxxx684.dkr.ecr.us-east-2.amazonaws.com/data-processor:latest
At this point, you can see all of the pushed images in AWS web console
AWS >> ECR >> Repositories >> data-processor
4.4.) Create a Cluster
Create a cluster to deploy and scale the microservice.
Sample Configuration
Cluster name      : Prod-DataProcessor-Cluster
Provisioning Model: On-Demand Instance
EC2 instance type : <select desired size>
Number of instances: 2 (keep minimum 2 for HA)
Key pair          :  <select an existing keypair created for the application deployment>
VPC               : <select your vpc>
Subnet            : <select multiple subnets for HA>
Security groups   : <Create a new security group and confirm port 8080 is accessible from internal network >
Note: Fill the remaining columns appropriately or leave default values.
Once the cluster is created, you can see two EC2 instances are created in two different availability zones. (Availability zones are different physical locations)
As part of Cluster creation, an autoscaling group and launch configuration will be automatically created. We can add scaling policies for cluster instances in the auto-scaling configuration later.
Now, we have an HA infrastructure for deploying or application ( only for application we will discuss about DB HA later)
4.5.) Create the Task Definition
We have the docker image in ECR, our cluster is ready for deployment. Now we need to define tasks to be deployed in the cluster.
AWS >> ECS >> Task Definitions >> Create New
Give a meaningful name for your “task definition”. Select “EC2” model for deployment. AWS providing another option “Fargate”. We will be using EC2 in this example.
There are a lot of options available for the advanced configuration. In this example, we will use the minimum configurations to make the application highly available and scalable.
Sample Configuration:
Task Definition Name     : data-processor-task
Requires Compatibilities : EC2
Network Mode             : <default>

Container Definition:

  Container name* : data-processor
  Image* :  28xxxxxxxx684.dkr.ecr.us-east-2.amazonaws.com/data-processor:latest
  Memory Limits (MiB)* : <Set the Soft limit of memory for your container Eg: 2048 >

Port Mapping :

  Host Port: 0
  Container Port: 8080
  Protocol: tcp

Note: configure the network mode “default” and Host Port ‘0’. Since we are using microservices, we may need to run multiple containers in the same host machine. In our example, our docker will listen on port 8080. If we select specific port mapping like Host Port : 8080 and Container port : 8080, only one container will be able to run in the Instance. When the second one starts, it will not be able to bind to the host port 8080 since it is already mapped to the first container.
If we put the “Host port: 0”, any number of containers can bring up in the same instance. The container will listen to port 8080 but it will bind to the available free port of the host machine,
For example
Host:4376 >> Container 1:8080
Host:4377 >> Container 2:8080
Host:4378 >> Container 3:8080
We can attach an Application load balancer to distribute the traffic among the containers.
Leave the other columns with default values (or customize as per requirement) and create the task definition.
You will get the latest version of the task definition. If update the task definition, a new version will be created. So if needed, we can go back to the previous version.
4.6.) Create an Application LoadBalancer
Based on the nature of communication between the microservices, create required internal load balancers and internet-facing load balancers. In most cases, only front end and APIs will require an internet-facing load balancer. All other microservices will require internal communication and internal LBs will suffice and secure. In our example, we are creating an internet-facing application load balancer that will listen to port 80. ( SSL is recommended in production)
AWS >> EC2 >> Application Load Balancer
Sample Configuration
 Name     : dataprocessor-lb
 Scheme   : Internet Facing
 Protocol : http  port : 80

Availability Zones

 VPC   : <Select your VPC>
 Subnet: <Select multiple subnets where your cluster instances reside>
 Security Group: Select your predefined security group which accepts traffic from the public.

 Configure Routing
 Target Group : <New Target Group>
            Name  : data-processor-tg
 Target Type: Instance
 Protocol   : http
 Port       : 8080

 Register Target
 < Do not add any Instance. We will do it later while configuring Services>

Review and create the LB.
We will use the application load balancer to route the traffic between the microservices bind to dynamic ports in the Cluster instances while configuring the Services.
4.7.) Create the Service
Select the cluster “prod-data-processor” (or whatever name you have given) and click on “Services” then “Create”.
Sample Configuration
Launch type     : EC2
Task Definition :
     Family     : data-processor-task
     Version    : 1 (latest)
Cluster         :  prod-data-processor
Service name    : data-processor-service
Service type    : Replica
Number of tasks : 4
(add minimum 2 so that at least one containers will run in each instance in each availability zone. In this example 2 containers will run in each instance in each AZ)
Placement Templates : AZ Balanced Spread
(The deployments will balance across available AZ)

Under LoadBalancing

Load balancer type*   : Application Load Balancer
Load balancer name    : dataprocessor-lb
Container to load balance :
       Container name   : port : data-processor:0:8080
      (Click on Add to Load Balancer)
Production Listener Port :  80 (This will create a new lister in our existing load balancer)
Target group name : <Create  new Target Group by providing the name here>
Cluster VPC : <your VPC>

Leave all other columns with default values (or customize with appropriate ) and finish the setup.
Once this step is finished, ECS will do the following things
- Create a Service
- Deploy the containers in the Cluster instances across the Availability Zones
- Add a new listener to the Application load balancer
- Create a new target group
- Register the running containers in the New Target group.
AWS ECS will check the health of microservices and if any of them failed, new containers will spin up automatically. It will also distribute the containers across different availability zones. Amazon Ensures HA for the load balancer.
However, to avoid any region-specific failure, the same infrastructure need to be configured in a different region and load balance the traffic through DNS
5.) HA for User Files
Application HA is almost ready. Now, consider the files uploaded by the users. Since we have multiple containers running across different availability Zones, user files can’t be kept locally. We have to move it to a centralized HA storage location. Amazon providing a reliable HA solution for storage. That is Simple Storage Service or S3.
S3 is a highly available service provided by AWS however, there are incidents related to the regional outage that was reported. To avoid any region-specific failure of S3, we can do the following.
5.1.) Cross-region replication.
AWS is proving the facility to replicate all contents in one bucket to another bucket in a different region. We need to create two buckets in different regions and configure cross-region-replication. So if anything went wrong with the S3 in one region, files can be accessed from the second location.
5.2. ) DNS level failover.
By configuring DNS failover with Route 53, you’ll be able to know when an S3 bucket is down, and automatically divert requests to a bucket in another region
Note: Furhter reading for S3 failover https://read.iopipe.com/multi-region-s3-failover-w-route53-64ff2357aa30
6. ) Database High Availability
RDS is one of the HA Database services provided by AWS. Its uptime is 99.9%. Almost all industry-leading DB services are available with AWS RDS. Configuring the RDS is pretty straight forward. To ensure HA, we have to enable the Multi-AZ feature of RDS. Multi-AZ is a feature provided by AWS for DB failover. If we enabled this feature, a replica of our RDS instance will be kept in a different region and in case of any failure of the primary zone, the secondary location will come up automatically. AWS will handle the DNS changes.
7. ) Application Scalability Configurations
Application scaling can be executed based on different parameters. Either native or custom cloudwatch metrics can be used. In our example, cpu utilization is considering as the threshold of the scale-in/scale-out trigger. To configure the scaling options for the microservice deployed, edit the service that we already configured in the cluster “prod-data-processor”;
7.1) Microservices Autoscaling Configurations
AWS >> ECS >> Clusters >> Services>> data-processor-service
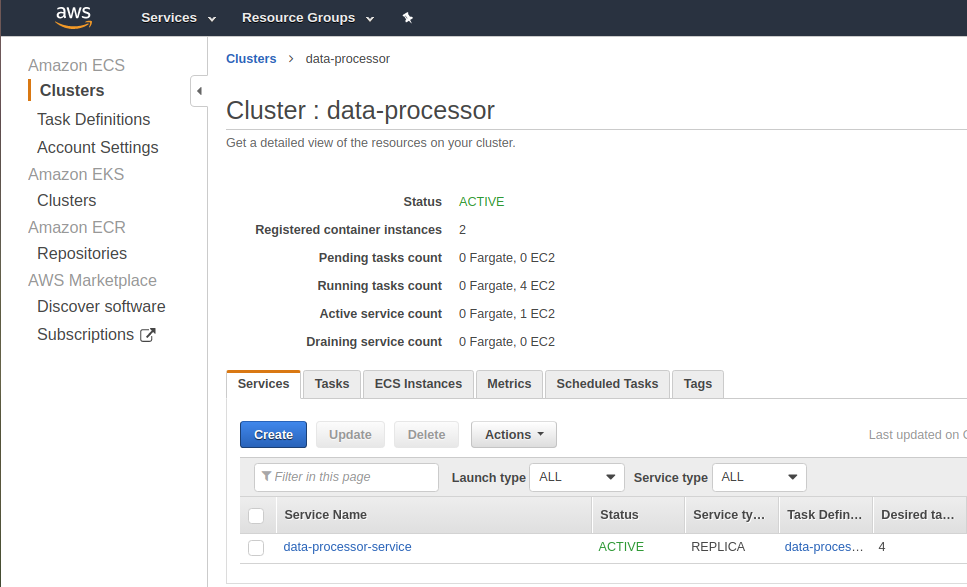
Select the service “data-processor-service” and click on “update” and select the “Configure Service Auto Scaling to adjust your service to the desired count”.

Sample Configuration
Minimum number of tasks : 4
Desired number of tasks : 4
Maximum number of tasks : 20
Continue with the Auto Scale-Out and Scale-In policy configurations
7.1.1.) Microservice Scale-Out
Automatic task scaling policies

Add Policy >> Select "Step Scaling"
Policy name* : data-processor-scale-out-policy
Execute policy when : (Select Create New Policy)
Alarm name : dataprocscaleout
ECS service metric : CPUUtilization
Alam Threshold: Average of CPUUtilization  >= 70% for  consecutive periods of  5 minutes
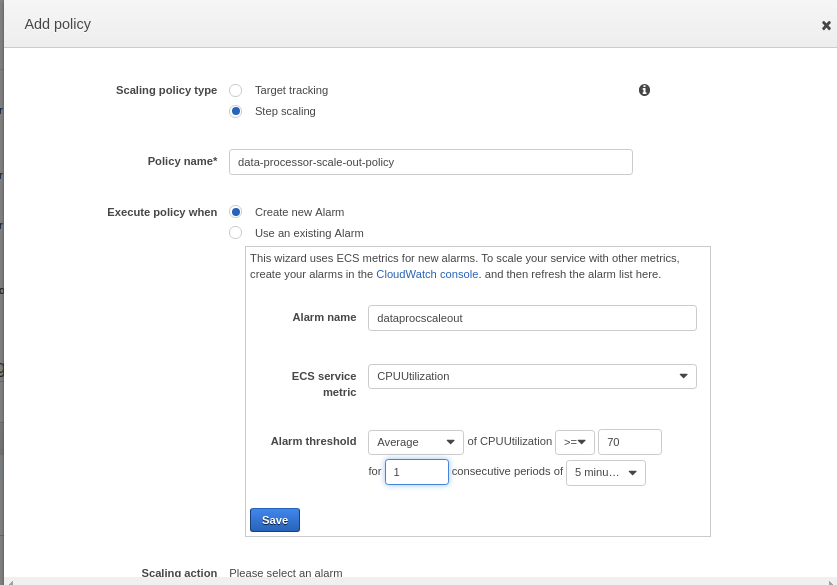
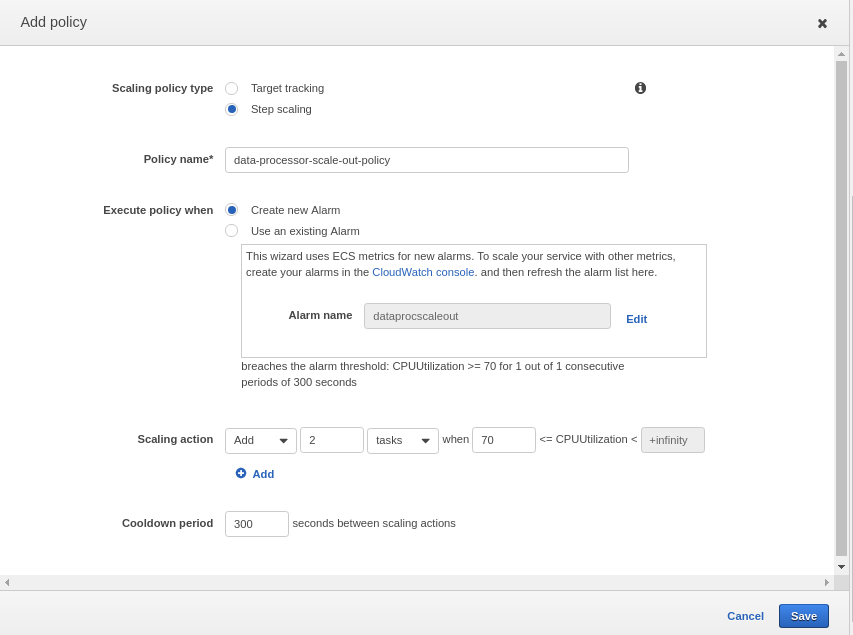
This will create an alarm named “dataprocscaleout”. Once Alam is created, we can create a scaleout action. As shown in the below image, create action to add 2 containers on triggering the alarm. As a result, when the average CPU utilization of all instances in the “prod-data-processor” cluster is above 70% for the last 5 minutes, it will trigger the scaleout action and 2 new containers will be deployed in the cluster. As we have already attached an Application load balancer to the cluster, newly created containers will automatically be registered to the LB and start sharing the traffic.
Now, scale-out action is ready. When the traffic/load increase in the existing containers, it will keep on adding 2 instances until it reaches the maximum task limit of 20 (As seen in the Sample Configuration above)
7.1.2. )Microservice Scale-In
Scale-in during off-peak hours is also important. When load/traffic decreases, the number of containers should bring down to a minimum gradually. Create a new scaling policy by clicking “Add Scaling Policy” again, select “Step Scaling” and create an alarm to trigger when the average CPU utilization is below 30% for the last 30minutes or so. This policy is to remove 2 containers from the cluster when the alarm triggered.
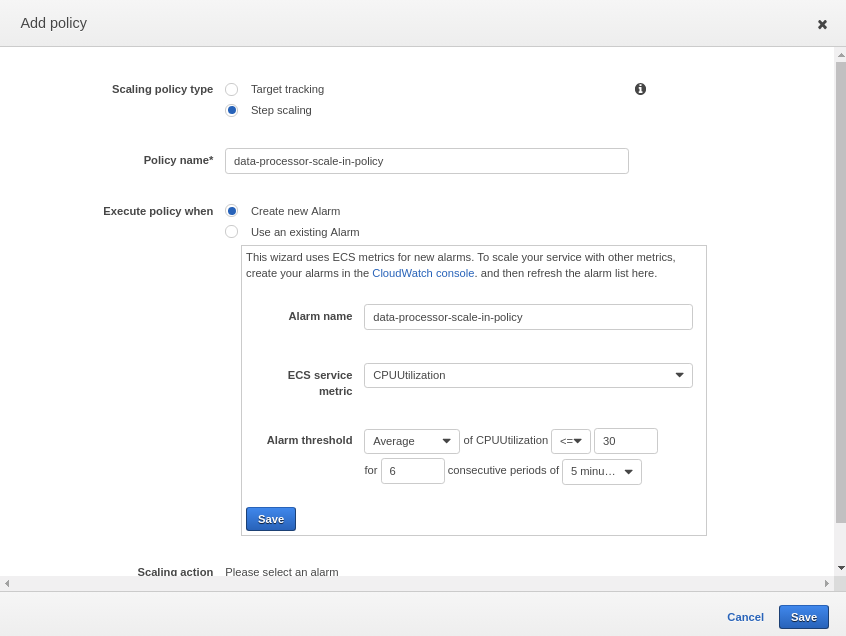
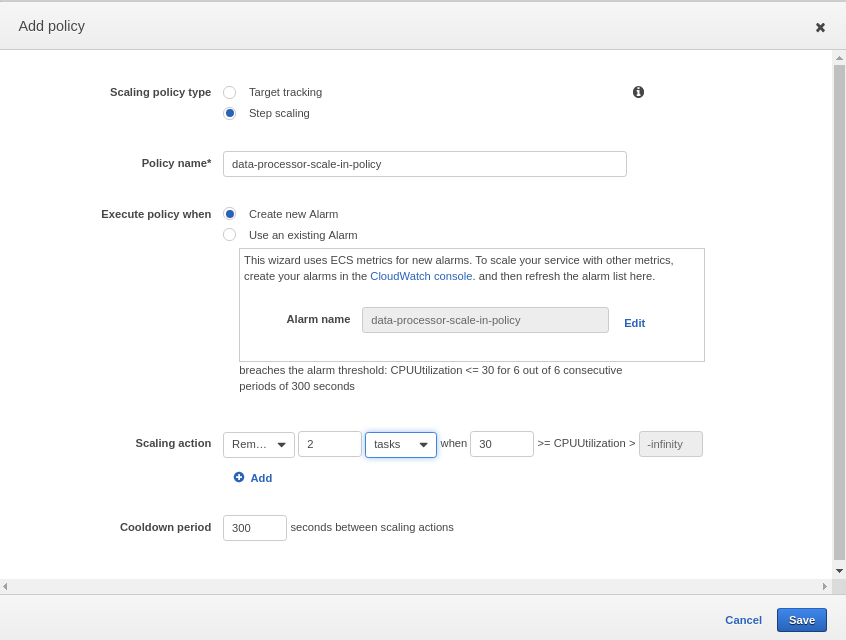
As seen in the above images, a new scale in policy “data-processor-scale-in-policy” is created and Scaling action is configured to remove 2 containers/tasks from the cluster.
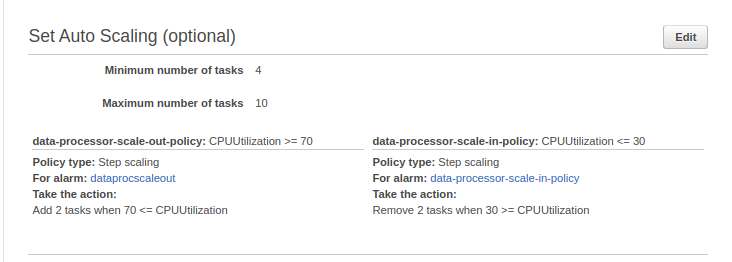
Review the settings and finish the setup.
At this point, microservice level Auto scaling is configured. This setting will scale the container deployments only.
7.2) Container Instance (Host VM) Autoscaling Configurations
When the containers increased beyond a limit, existing host machines will not be able to hold all containers. So autoscaling needs to be configured on cluster instance level as well.
To configure auto-scaling for host machines, policies need to be added to the autoscaling group.
AWS >> EC2 >> Auto Scaling Groups
Select your autoscaling group and click on Scaling policies
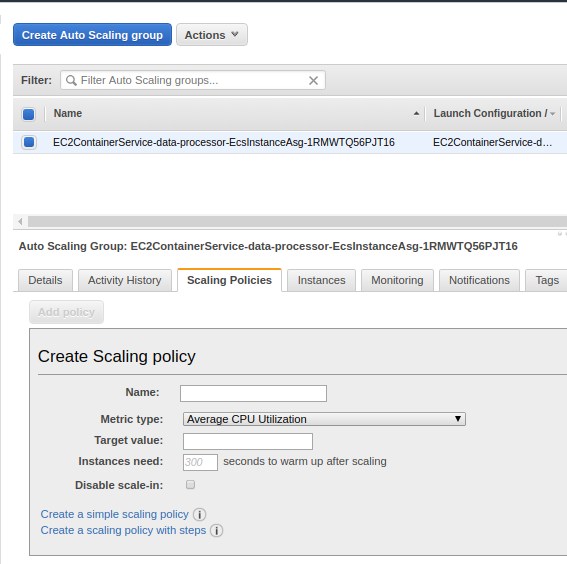
Create a step scaling policy. Similar to container scale-out policy, Average CPU utilization can be monitored and add 2 Instance (Host VM) to the cluster. So on increasing load, new containers will be created and those can be accommodated in the new VMs.
Similarly, create one more scaling policy to scale-in the host machine when the average CPU Utilization is below 25% for the last 30minutes. This will remove instances from the cluster on off-peak hours.
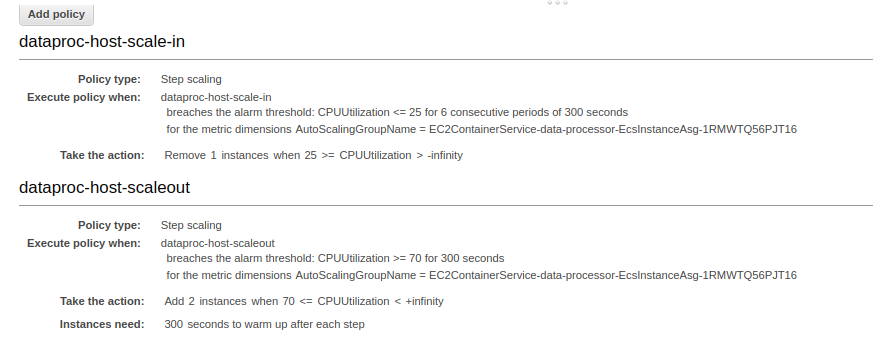
Note: The configuration, min/max limits, scaling thresholds etc are populated with sample values. In actual environments, load tests need to be executed and properly determine the matrics at which the containers as well as the Instances to be scaled-in /scaled-out.
8.) Conclusion
We have discussed about, how we can deploy a single microservice in the highly available and scalable environment in AWS. Of course, In an actual product, there will be numerous microservices that will play its role. Configure individual clusters for each or a group of microservices, create separate tasks, services, scaling policy, etc. Add internal load balancers for a similar kind of microservices for internal communication. Use route53 for internal DNS mapping (so that you can create your own meaningful domain names rather than Amazon’s long URLs). Distribute the containers, Databases, Storage across regions etc are some of the major steps towards making your application Highly Available and Highly Scalable.

